West Coast Aboriginal – First Nation Indian Art
The Challenge
My wife, Donna, & I first
visited the West Coast of Canada in 2004.
We were greatly impressed by the sophisticated and inspiring work produced
by this ancient and still vibrant art form. I
had not indulged in craft work since a did a "suspension' for my office many years ago.

However I found myself drawn to make attempts at reflecting the west coast images. My first attempts were a series of
“suspensions” – images cut in sheets of thin high density particle board and
coloured in layers.
My first project used poorly developed images but the basic approach seemed to work.

Haida Memories reflected the works of
Bill Reid, an eagle in his jewelry, his Killer
whale at the Vancouver Aquarium, his raven & at the art museum of
Anthropology & his bear at the museum of Man and Civilization in Hull, Ontario

The 2nd Haida Memories
used many of the same images, &
layering but a new bear and a different surround.

The third was a painting – The
images now included the eagle, raven & bear from Haida Guan at the museum
of Man in Hull. But now I wanted to work in 3 dimensions – ie make masks
reflecting the west coast art. In the painting I explored the use of acrylics
& a selection of colours for the masks.

SMILING MOTHER MASK
In my search for an image I found Will-a-daugh, of the “ Skimsim & Will-a-daugh” Gitksan First Nation memorial totem pole.
Hers was the only image I came across on the web or in my books that had even a
hint of a smile. The mother is reported to have gotten pregnant from a grub. Hence the Mona Lisa like smile?


I
learned of the extensive interest in the pole after I chose the image for my
mask. - time to learn a little about the poles significance.
The totem pole been erected about a thousand years ago near Ke-an (Prince Rupert Harbour). It was the first pole erected at Kitwancool by the clan of the Wolves . When they migrated, they took along duplicates of their totem poles and erected them in their new permanent villages. The poles establish the power of the chief and the right of ownership of the lands. The poles tell the people the size of their village, the mountains they own, their hunting and fishing grounds.
The poles at Gitanyow (Kitwancool) village, north of the Skeena River (shown in these photos taken in 1910) were carved in the 1800s and 1900s. The Skim-sim and Will-a-daugh pole, may be seen in front of the third house from the left.

Will-a-daugh is holding her child. Will-a-daugh was
a chief’s niece at Ke-an (Prince Rupert) who conceived a child from a wood grub.
The nose of the ancestress on the original pole was probably long and sharp
edged.


American artist
Langdon Kihn* sketched and painted views of Kitwancool, now known as Gitanyow,
in 1924 at the behest of Marius Barbeau. His graphic style reflects his forte
as an illustrator. He was given to reinterpret Northwest Coast sculpture and
design, and to recompose the settings of totem pole.
Emily
Carr painted the “Totem Mother , Kitwancool” in 1928, oil on canvas, when the community was still quite isolated. The
painting is in the Collection of the Vancouver Art Gallery, Emily Carr
Trust, Photo: Trevor Mills, Vancouver
Art Gallery.

In 1958, an agreement was signed by the People
of Kitwancool permitting anthropologists to
collect and preserve this and several other poles in museums. In return, the
anthropologists agreed to publish the histories, stories, and traditions of
Kitwancool so future generations of both Native and non-Native students could
learn about them. The booklet, 'Histories, Territories and Laws of the
Kitwancool' is still in print. Replicas of the original pole
were made at Gitanyow & the original pole was moved to the B.C. Museum of
Anthropology.


One
replica pole remains at Kitwancool, B.C. Kitwancool is 20 miles north of Kitwanga on the B.C. hwg. 37, north of 16. The BC government erected a plaque as a tourist attraction.


Another replica is in the Thunderbird Park in Victoria
B.C


Ironically I rediscovered it in pictures of Donna & I at the Park in 2004


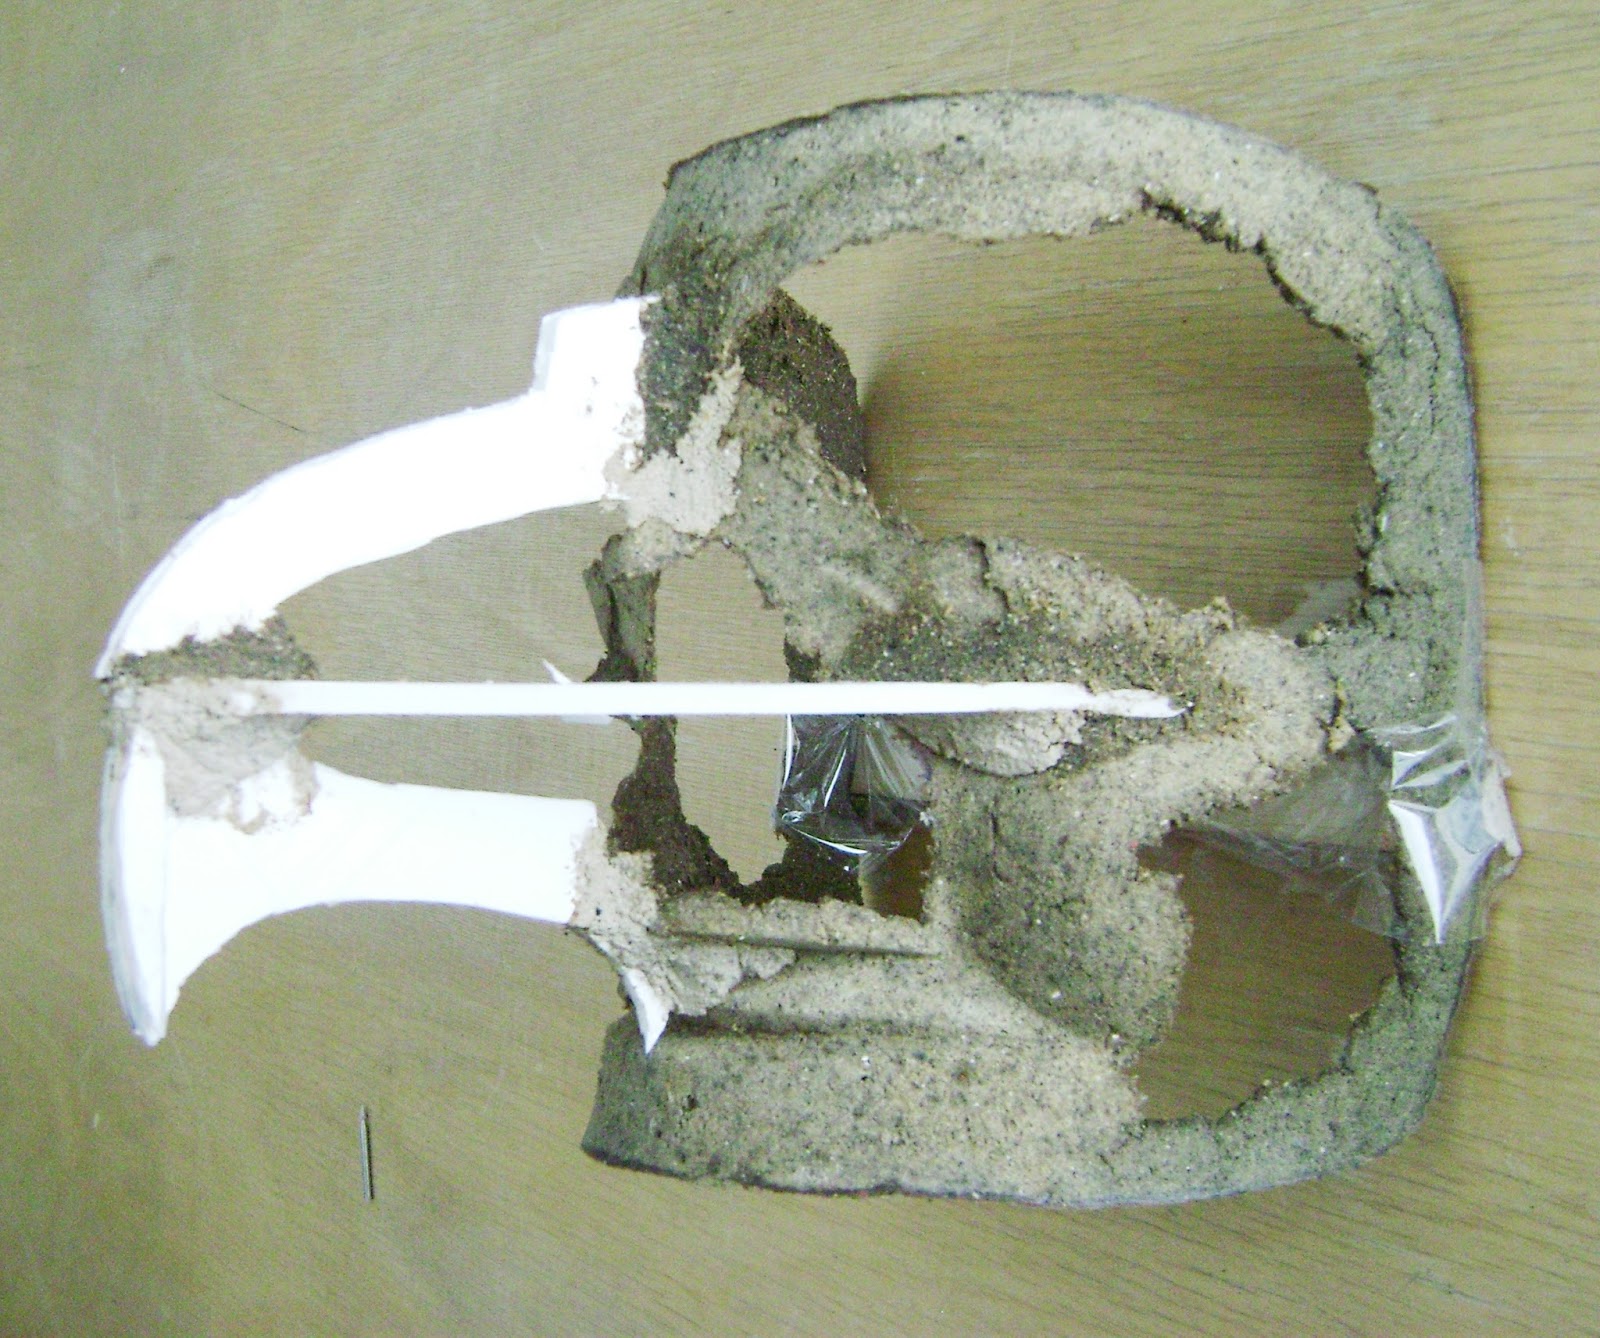
I began my task of mast making by enlarging a front view and profile of the image to the size of the mask.


From these I developed horizontal sections which became the cutting outline for layers of styrofoam as a core for the sculpture.

The core was covered with plaster for carving.

I wanted
to make several masks, some reflecting the original image, using a common form
so I elected to use the sculpture as a plaster "plug", fabricate a fibreglass mold & lay up wood masks
in the mold. A frame was constructed around the plug to form an edge for the mold.

The mold was builtup, using standard fiberglass techniques, except that auto body bondo was used rather than laying up sheets of fiberglass.


I chose wood putty to fabricate the masks. The material is relatively light, reasonably strong and takes a good finish. Fortunately I had a good supply of fine router cuttings from the high density hardboard used in my Kiosk project.
Vegetable oil was used a a parting agent, sprayed lightly with a mister. It gave reasonable separation. I will try WD40 for the next layup.
I mixed small quantities - to insure using the material before it starts to set - mix 15 ml (1tbsp) of carpenters glue, and 7.5ml (1/2 tbsp) of water, then work in 30 ml (2tbsp) of sawdust. Experiment with the mixture to get a very soft creamy putty, like toothpaste. The material is easy to work, spreads well, holds its shape & adheres well to itself.
I used 3 2mm (1/16") layers with lots of drying time (2 weeks?) between.

Repair imperfections with wood filler, sand & prime to prepare the surface.


Gecco & acrylics provide a finished product, my first attempt to reflect a west coast, aboriginal, first nation, native, three dimensional image - in the form of a mask - "Smiling Mother"


EAGLE WARRIOR MASK
My next attempt was in response to this Haida eagle warrior which I found in a article.

A second mast was molded, sections removed and added with the same wood putty and worked to a final shape.


Painted the mask was basically finished for display.


With this mask I also experimented with wearability. Both masks fit comfortably around the face, but the eye hole location was a challenge. I cut small viewing eye holes in the area surrounding the mask eyes and changed the colour to black. For display, black electrical tape on the inside the mask makes the viewing holes almost unnoticeable.
.JPG)
An intimidating "Eagle Warrior" ?

A friend
requested a painting with images of a Orca & a Bear so I worked up a small 12” plaque. The images are reflections on Bill Reid's Killer Whale & the headdress of a Tlingit Chief we visited during our trip to Alaska in 2013.


RAVEN MASK
My third mask
is a reflection on Raven images. In the Haida Culture, Raven plays an important role.
The creation story says that Raven opened a clam shell from which the
Haida people emerged. Bill Reid portrayed the event in his Raven & the First
Man sculpture now at the UBC Museum of Anthropology in Vancouver. I had a
good look in 2004.

The Raven in Bill Reid's Spirit of
Haida Gawii sculpture at the Museum of Man & Civilization at Hull Quebec was another influence on my mask. The cunning trickster, Raven, holds the
steering paddle, symbolic of nature's unpredictability.

My mask was fabricated by modifying a duplicate of the Smiling
Mother Mask. A profile for the addition (and removal) was drawn to fit the original mask.

A horizontal section was developed to outline the basic shape for the addition. Cardboard versions of the horizontal and vertical structures were cut out, fitted to the mask and used in cutting the molds for the permanent structures that shape the addition.

Molds for the structures for the addition were cut from scrap
plastic and sprayed with WD40. The structures for the addition were then molded with the wood
putty mixture.

The structure for the profile was held in place by an adjustable light
& secured to the mask with the wood putty mixture.

A piece of wood held in a vise with a base tilted to the appropriate angle provided support for the horizontal sections. Right &

Left.

Foam was used to support the buildup of the bill.

Build up of the eye & brow and cutting down of the brow was started.

Eye holes were located & plastic tubes used to gauge the
depth of the buildup. The cheek & mouth of the original mask still have not been modified. Note
that the weight of the build up required a clamp to keep the mask balanced.

I decided to remove the interior of the structure to
lighten the mask and keep it in balance.

Cardboard was added to support the buildup of the beak, top and

Bottom. In hindsight the structure should have been built
with this step in mind - with ribs rather than solid sections – would have
saved cutting out the interior.

The basic shape is starting to mature.

Wood filler was used to fill in small imperfections, the eye openings cut and the nostrils added.

The mask, after layers of wood filler, sealer primer and Gesso have been added, with intermittent sanding and with the layout for painting added.

Traditional Haida colours were chosen for painting

Almost Finished


Warrior (2013),Smiling Mother (2011) & Raven (2015)


Mask # 4 -Another
Raven
The second Raven had several slight changes to shape - beak
more horizontal beak and eyes slightly smaller.

The “structure” is established as additions to the base mask
The vertical & horizontal beak structures are outlined on this drawing

Enough planning - on with construction and applying some of lessons learned from first Raven mask
1.. The ‘structure “can be cut easily from 1/4” foam board". and the sides of the beak can be formed from cardboard

2. Portions of the first Mold can be eliminated if not
needed in the “build up” - we left out the nose.

3. The structure can be self supporting for insulation.

4. Beak sides can be held in place with tape & clamps
until paste sets up.

5. A trial version of
the beak fill in can be cut from paper & modified till it fits. It can then
be used as a pattern for the final 2 cardboard fill ins.

6. A small hole is drilled in the corner of the eye to insert a small tub

7. The tubes in the Eyes help position the plastic to form a
guide. A guide for shaping the second side of the mask can be traced on plastic
& cut out to allow tracing on to the other side

\
8. The guide is traced with a marking pen & slots cut
with a sharp knife

9. Shapes for the “nostril” are cut from ¼” foam & secured
to the beak infill

10. Top of nostril
shaped with cardboard & the mask is in final form ready for finish.

Finished Raven


Another requested painting - Orca & Bear

Mask #5 is an Eagle mask
inspired by the eagle image on a Tlingit War Helmet Rediscovered after
100 years

This fantastic Tlingit war helmet was rediscovered in 2013 in the backroom of a museum in Springfield, Massachusetts. The helmet was accessioned in 1899 as an “Aleutian hat”.
Only 95 war helmets are known, with the largest collections found in
Russia. They are part of an elaborate system of armour known from the
contact and early historic period in Tlingit territory (Southeast Alaska –
Alaska Panhandle).

They are carved from a single piece of wood, in this case with
an eagle crest or motif.
In the “The Battle of Sitka, June 1802“ The armour included
helmets and neck guards, or gorgets. The helmet and gorget together make just a little slit for the eyes, not to mention fearsome appearance
Russian
and Tlingit conflicts occurred in Southeast Alaska in the late 1700’s and early
1800s. Sometime near the summer solstice in 1802 hundreds of Tlingit warriors attacked
the Russian/Aleut settlement of St. Michael’s, near present day Sitka, Alaska,
slaughtering most of the inhabitants. In a carefully planned assault half of
the attacking force came by immense war canoes and the other half descended on
the fort from the surrounding forest.
A Russian historian named Khlebnikov
wrote this passage about the attack:
The Tlingits “suddenly emerged noiselessly from the shelter of the
impenetrable forests, armed with guns, spears and daggers. Their faces were
covered with masks* representing the heads of animals, and smeared with red and
other paint; their hair was tied up and powdered with eagle down. Some of the
masks were shaped in imitation of ferocious animals with gleaming teeth and of
monstrous beings. They were not observed until they were close to the barracks;
and the people lounging about the door had barely enough time to rally and run
into the building when the (Tlingits), surrounding them in a moment with wild
and savage yells, opened a heavy fire from their guns at the windows. A
terrific uproar was continued in imitation of the cries of the animals
represented by their masks, with the object of inspiring greater terror.”
Today, a few helmets are still brought out at
ceremonial gatherings, such as potlatches, to commemorate prominent events and
honor past clan elders. Because they are associated with combat, the
helmets are not actually worn on the head during such peaceful gatherings, but
are instead held in hand or perhaps held over the head of someone needing
spiritual support.
First step - -in developing our mask - enlarge the photo to the required size.

Next - Sketch the basic shape & form

Work out the details for the eye, its surround, the nostril & the divide between beak & body & eye

Develop guides for the shaping & painting of both sides of the mask

And specific guides for the shape of the beak, cutting the sides & paint features.

Next work out the structural details
Note the outline for the cap on the lower right of the
sketch. ¼’ foam additions are added horizontally to the mask where the beak
meets the top. Note also the Jaw
addition added under the lower beak fill.
The drawing also provided layouts for the upper &
lower beak structures and the beak sides.

Beak horizontal structure

Enough “planning “ - on with construction
When molding the base
mask for the eagle we left out to much, should
- fill in the mask eye completely - it is left blank here -
an error
- keep forehead
-keep nose, top & bottom as done in the picture &
leave out mouth “slot”
- leave out cheek bulge, we left in here
Note light wooded support added to mask to help keep it’s
shape when out of the mold

Now let us assemble the parts-
Since the beak structure is horizontal, scrap material
taped to the bench can support the mask & the beak

Paste place

The lower beak structure is then added to the mask ( actually the mask is sitting vertically on bench
The sides of the beak are clamped & taped on - note the extension of mask sides
and the flat fill in of the mouth slot, eye and the cheek bulge
(it was cut away after molding)

The final mask - ready for paint touch up & wear
ability experimenting.

Note the eye cut out - it can be covered inside with black electrical tape for display.


Since we were experimenting with “wear ability” this mask was also provided with breathing holes in the lower beak

The surround was
app. ¼” thick. A shallow notch was cut in the surround to accommodate the clips
and they are held in place temporarily by small clamps
We used clips from scrapped swim fins as anchors
for the mask straps.
Sliding part of clip is secured with tape & pivoting joint
lubricated with wd40
Then clips are permanently secured by the normal paste

Dive mask straps are secured to clips & mask.
The mask eyes do not share
the same view - The view is divided by the beak. Ironically the eyes have a
small common view though the nostrils, giving depth in a limited field.
Note Wearer’s eye slot is shown in this picture - because flash
was used to take picture.
Black bike rider’s skull
cap blends with mask
This eagle is ready to fly!!!

No comments:
Post a Comment